In the vibrant world of anime and manga, few character archetypes capture hearts quite like "Moe." These endearing, often youthful figures possess a unique charm that makes them incredibly popular, and mastering the art of Drawing Moe Characters Tutorials is a coveted skill for aspiring artists. Whether you dream of creating your own captivating manga series or simply want to draw characters that radiate irresistible cuteness, this guide will walk you through the essential techniques, from foundational anatomy to crafting truly original designs.
Forget stiff, lifeless drawings. Our goal here is to help you infuse your characters with personality and appeal, making them feel genuinely alive on the page.
At a Glance: Your Moe Drawing Journey
- Understand Moe Basics: Grasp the core visual traits that define a "Moe" character, especially their youthful, expressive faces.
- Master Facial Features: Learn to draw iconic large eyes, delicate noses, and expressive mouths that convey a wide range of emotions.
- Proportion the Body: Discover the unique body proportions that give Moe characters their distinct charm, balancing cuteness with believable anatomy.
- Create Dynamic Poses: Move beyond static figures by learning how to pose characters dynamically, showing action and personality.
- Design Original Characters: Go beyond copying to develop your own unique Moe characters with distinct looks and backstories.
- Bring Illustrations to Life: Understand how to compose full illustrations, adding background, lighting, and narrative.
What Exactly Makes a Character "Moe"?
Before we dive into the technicalities of drawing, let's briefly define "Moe." Originating from Japanese popular culture, "Moe" (萌え) refers to a feeling of strong affection, fondness, or even adoration towards fictional characters, often depicted as cute, innocent, and sometimes vulnerable. Visually, Moe characters typically feature:
- Youthful Facial Features: Large, expressive eyes; small noses and mouths; soft jawlines; and rounded cheeks.
- Emotive Expressions: A strong capacity for conveying a wide range of emotions, often exaggerated for dramatic or comedic effect.
- Relatable Personalities: While not strictly visual, their personalities often lean towards innocence, shyness, cheerfulness, or a touch of clumsiness, making them endearing.
- Proportions: Often slightly idealized or exaggerated, balancing a youthful appearance with a sense of grace.
The beauty of Moe is its versatility. While often associated with female characters, the underlying principles of cuteness and appeal can be adapted. For a deeper dive into the broader world of anime art, you might want to Explore NT Anime as a starting point.
Chapter 1: Crafting the Irresistible Moe Face
The face is the focal point of any character, and for Moe, it's where much of the charm lies. You'll want to master the art of conveying youthfulness and emotion here.
Building the Basic Head Shape
Start with a simple foundation. Most Moe characters begin with a slightly rounded head shape, often wider at the top and gently tapering towards a small, pointed chin.
- The Circle Guide: Begin with a clean circle for the top of the head.
- Jawline & Chin: Extend two lines from the sides of the circle, curving inwards to meet at a point for the chin. The length of these lines determines how "young" or "mature" your character appears. Shorter lines mean a rounder, more childlike face; longer lines create a more pronounced jaw.
- Cross-Guides: Draw a vertical line down the center of the face and a horizontal line about halfway down. These will help you align features symmetrically. Adjust these lines to indicate head tilts or turns.
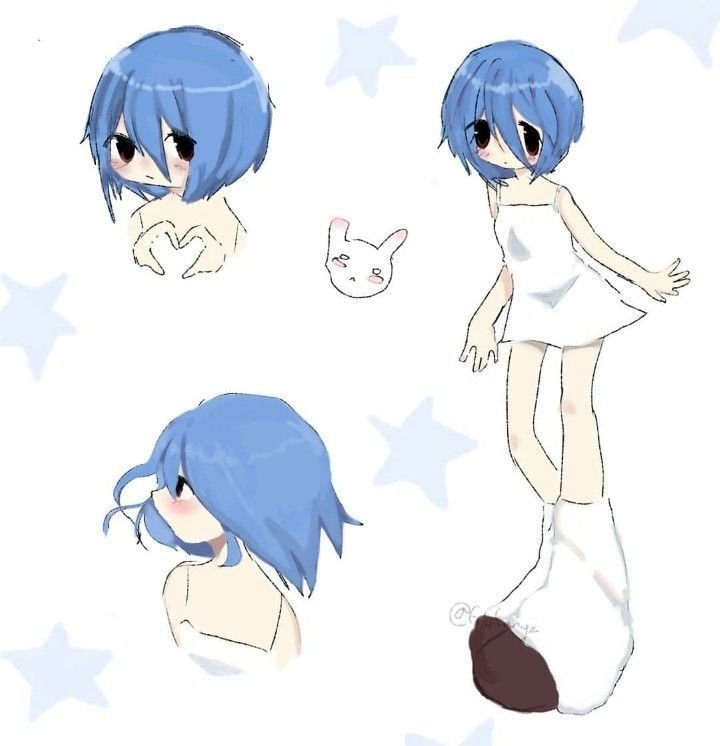
The Anatomy of Moe Eyes: Windows to the Soul
Moe eyes are arguably the most defining feature. They are typically large, often taking up a significant portion of the face, and packed with detail to convey emotion.
- Placement: The horizontal guide line you drew earlier often marks the top or center of the eyes. Place them far enough apart that another eye could fit between them.
- The Shape: Moe eyes are usually almond-shaped, but with a much larger, more rounded bottom curve. The top lid often has a prominent curve, especially towards the outer corner.
- Pupil and Iris:
- Iris: Large and often very colorful, dominating the eye. It's rarely a perfect circle; often it's cut off by the top and bottom eyelids.
- Pupil: A small, dark dot within the iris.
- Highlights (Catchlights): These are crucial! They are bright, often white, shapes that represent light reflecting in the eyes. Place one large highlight near the top, and maybe one or two smaller ones elsewhere. These give the eyes sparkle and life. Varying highlights can create different moods (e.g., small highlights for shy, large for excited).
- Eyelashes: For female Moe characters, eyelashes are often prominent, curled, and can be drawn as small clumps or individual strands along the upper lid. Lower lashes are usually fewer or absent.
- Eyebrows: Thin and expressive, placed relatively high above the eyes. They communicate a character's mood just as much as the eyes do. Arch them for surprise, angle them down for anger, or keep them flat for a neutral expression.
Noses and Mouths: Subtle yet Significant
These features are generally kept small and simplified in Moe art to emphasize the eyes.
- Nose: Often just a small, subtle dot or a short line indicating the bridge and nostril. Sometimes, it's merely a tiny shadow or omitted entirely in certain styles. Placement is usually about halfway between the eyes and the chin.
- Mouth: A small, delicate curve. It can be wide and cheerful, small and pouty, or a simple straight line. Lip details are typically minimal or nonexistent. Pay attention to how the mouth shape changes with expression – a simple upturned curve for a smile, a slight "ω" shape for surprise or cuteness.
Framing the Face: Hairstyles
A character's hairstyle is a powerful tool for defining personality and can add significantly to their Moe appeal.
- Variety is Key: From long flowing locks to short, playful bobs, pigtails, braids, and intricate updos, the possibilities are endless.
- Volume and Flow: Moe hair typically has a lot of volume and dynamic flow. Don't draw individual strands; instead, think in terms of large, overlapping clumps and sections that convey movement.
- Bangs (Fringe): Often styled in various ways – swept to the side, blunt-cut, choppy – bangs frame the face and draw attention to the eyes.
- Ahoge (Antenna Hair): A single, often prominent strand or tuft of hair that sticks up from the top of the head, adding a touch of innocence or playfulness.
- Styling for Personality: A character with neat, twin braids might seem prim, while spiky, messy hair could indicate a more energetic personality. Experiment with different styles to see what best suits the character you're imagining.
Chapter 2: Drawing the Expressive Moe Body
Moving beyond the face, the body allows your Moe character to interact with their world. Moe body proportions are slightly different from realistic anatomy, emphasizing youthfulness and dynamism.
Moe Body Proportions: A Guide to Cuteness
While realistic human bodies are typically 7-8 heads tall, Moe characters often fall into a younger, more idealized range.
- Standard Moe: Around 5.5 to 6.5 heads tall. This creates a slightly elongated but still youthful look.
- Chibi/Super Deformed: Can be 2-4 heads tall, exaggerating cuteness to an extreme. We'll focus on the standard Moe proportions for this guide.
Key Proportional Considerations: - Head Size: The head remains relatively large compared to the body, emphasizing facial features.
- Torso: Often shorter than realistic proportions, contributing to a more compact, youthful look.
- Limbs: Legs are often slightly longer than the torso, giving a sense of elegance, while arms are proportionate to reach the mid-thigh area.
- Hands and Feet: Kept somewhat smaller and more delicate than realistic adult proportions.
Dynamic Poses: Bringing Movement to Your Canvas
Static, straight-on poses can make even the cutest character look boring. Moe characters thrive on dynamic poses that convey emotion, action, and personality.
- Line of Action: Start every pose with a single, flowing "line of action" that traces the main curve of the body. This line dictates the pose's energy and direction.
- Basic Forms (Mannequin Sketch): Build the body using simple 3D shapes: circles for joints (shoulders, elbows, knees), ovals for limbs, and a bean or box shape for the torso and pelvis. Think of it as a flexible mannequin.
- Weight Distribution and Balance: Consider where the character's weight is shifted. If they're leaning, one leg will bear more weight than the other. If they're jumping, their center of gravity will be different. Pay attention to the "equilibrium" (as mentioned in the source material) to make poses feel natural and grounded.
- Exaggeration: Don't be afraid to exaggerate poses slightly to enhance expressiveness. A happy character might jump higher, an embarrassed one might hunch more.
Shoulders, Arms, and Hands: The Language of Gestures
These elements are critical for conveying subtle emotions and actions.
- Shoulders: Often drawn slightly sloped for female Moe characters, emphasizing femininity and a softer build. They should follow the perspective of the pose.
- Arms: Draw arms with gentle curves, avoiding stiff, straight lines. Pay attention to the natural bend at the elbow.
- Hands: Can be challenging, but simplifying them into basic shapes first (a palm as a trapezoid, fingers as cylinders) helps. Moe hands are often delicate. Practice common gestures: open palms, fists, pointing, holding objects, and the classic "peace sign." Focus on the overall shape rather than every individual knuckle.
Legs and Hips: Grace and Youthfulness
Moe legs are often slender and slightly elongated, contributing to an elegant and youthful silhouette.
- Hips: For female Moe characters, hips are typically rounded but not overly exaggerated, maintaining a youthful proportion. The tilt of the pelvis significantly impacts the pose – an upward tilt on one side can create a more dynamic, feminine stance.
- Thighs and Calves: Draw these with gentle, flowing curves, indicating muscle tone without making them overly bulky.
- Knees: Represented by a slight bump or curve, not overly defined.
- Feet: Like hands, often simplified. Think of them as wedges or basic forms. Practice different angles: flat, on tiptoes, and in motion.
Breasts: Proportionality and Styling
When drawing female Moe characters, the depiction of breasts varies greatly depending on the character's age, design, and the artist's style.
- Subtlety is Key: For young Moe characters, breasts are often small or simply indicated by subtle curves under clothing. The focus remains on youthfulness rather than mature proportions.
- Shape and Gravity: Remember that breasts are soft tissue. They are affected by gravity and movement. In a standing pose, they will have a natural sag; in a dynamic pose, they might bounce or shift. Avoid drawing them as rigid, perfectly round spheres.
- Clothing Impact: Clothing will compress and shape breasts. Consider how a tight top, loose shirt, or uniform will affect their appearance.
Drawing Clothing Folds: Adding Realism and Flow
Clothing adds depth, realism, and personality. Folds are not random; they follow principles of gravity, tension, and compression.
- Anchor Points: Folds emanate from points where fabric is pulled tight (e.g., shoulders, elbows, hips, knees) or hangs freely.
- Compression Folds: Occur where fabric bunches up (e.g., armpits, inner elbow).
- Tension Folds: Appear as straight lines where fabric is stretched tight over a form.
- Draping Folds: Occur where fabric hangs loosely, forming graceful curves (e.g., a skirt hem).
- Material Matters: Different fabrics create different folds. Thin fabrics will have more numerous, delicate folds, while thick fabrics will have fewer, heavier folds.
- Simplicity: Don't overdo it. Focus on the most important folds that define the garment's shape and how it interacts with the body.
Chapter 3: Creating Your Own Original Moe Characters
Now that you've got the foundational drawing skills, it's time to unleash your creativity and design unique Moe characters that stand out. This isn't just about drawing; it's about storytelling.
From Concept to Character Sheet
An original character needs more than just a pretty face; they need a persona.
- Brainstorming Core Concepts:
- Archetype: Do they fit a common trope (e.g., energetic tsundere, shy bookworm, clumsy magical girl)? How can you put a unique spin on it?
- Personality Traits: List 3-5 core traits. Are they optimistic? Sarcastic? Naive?
- Background/Story: Where do they come from? What are their goals, fears, and dreams? Even simple ideas can add depth.
- Keywords: Jot down words that describe their vibe (e.g., "sparkling," "gloomy," "mischievous").
- Visualizing Personality:
- Color Palette: What colors represent their personality? Bright hues for energetic, pastels for gentle, muted tones for mysterious.
- Clothing Style: Does their outfit reflect their personality or their daily life? A student uniform, a fantasy costume, casual streetwear.
- Key Accessories: Glasses, hairpins, unique jewelry, a specific bag – these small details can be very distinctive.
- Developing a Character Sheet: A character sheet is a reference document for your character. It includes:
- Full-body reference (front, side, back views)
- Facial expressions chart
- Key accessories and clothing details
- Color palette swatches
- Brief notes on personality, likes, and dislikes.
Moe Archetypes and Tropes: A Starting Point
Understanding common Moe archetypes can help you design familiar yet fresh characters.
- Genki Girl: Energetic, cheerful, always positive. (Think bright colors, dynamic poses, wide smiles.)
- Dandere: Quiet, shy, but opens up to those they trust. (Think subtle expressions, averted gaze, perhaps loose clothing.)
- Tsundere: Appears prickly and hostile but is secretly sweet and affectionate. (Sharp angles in expressions, sometimes crossed arms, but with moments of softness.)
- Kuudere: Emotionless, calm, and collected on the surface, but can show deep emotions under specific circumstances. (Minimal facial expressions, often elegant or mysterious attire.)
- Dojikko: Clumsy and accident-prone, but endearing. (Usually depicted in mid-fall, with a bewildered or sheepish expression.)
These are just starting points. Combine elements, twist expectations, and add your unique flavor to make your character truly yours.
Chapter 4: Bringing Your Moe Illustrations to Life
Drawing individual characters is one thing; creating a complete, compelling illustration is another. This chapter focuses on composition, storytelling, and refining your final artwork.
Composing Your Scene: What's the Story?
An illustration isn't just a character; it's a moment in time.
- Focal Point: Your Moe character should usually be the main focal point. Use lighting, color, and composition to draw the viewer's eye to them.
- Rule of Thirds: Imagine dividing your canvas into nine equal sections with two horizontal and two vertical lines. Placing key elements (like your character's eyes or body) along these lines or at their intersections can create a more balanced and engaging composition.
- Background Elements: A background provides context.
- Simple Backgrounds: A gradient, a few abstract shapes, or a light bokeh effect keeps the focus on the character.
- Detailed Backgrounds: A cityscape, a cozy room, or a fantastical landscape can tell a richer story but ensure it doesn't overpower the character.
- Depth: Use atmospheric perspective (fading colors, less detail in the distance) to create a sense of depth.
- Foreground Elements: Occasionally, elements in the foreground can frame the character, add depth, or enhance the narrative (e.g., leaves obscuring part of the view, a fence).
Lighting and Shadow: Shaping Mood and Form
Light and shadow are what give your drawing dimension and atmosphere.
- Light Source: Always establish a clear light source. Is it from above, below, the side, or multiple sources? This dictates where shadows fall.
- Core Shadow: The main shadow that defines the form of an object.
- Cast Shadow: The shadow an object casts onto another surface.
- Reflected Light: Light bouncing off surrounding surfaces can subtly illuminate shadowed areas, adding realism.
- Highlight: The brightest spot where light directly hits the surface.
- Mood Lighting:
- Bright, even lighting: Cheerful, innocent.
- Strong backlighting: Mysterious, dramatic silhouette.
- Soft, warm lighting: Intimate, peaceful.
- Dynamic, colored lighting: Energetic, fantasy-like.
Coloring Techniques: Bringing Vibrancy to Your Art
Color brings your character to life.
- Base Colors: Lay down flat, clean colors for each distinct area (skin, hair, clothing).
- Shading: Apply shadows using a darker, often desaturated, version of the base color. Consider using cool colors (blues, purples) for shadows, even on warm base colors, for a more vibrant look.
- Highlights: Add highlights using lighter, sometimes more saturated, versions of the base color.
- Blush: A soft blush on cheeks, nose, and joints (elbows, knees) is a common Moe technique to enhance cuteness and youthfulness.
- Color Blending: Decide between cel-shading (hard, distinct lines between colors) or soft blending (smooth transitions) based on your desired style.
- Line Art Color: Sometimes, changing the color of your line art to a darker shade of the area it outlines (e.g., dark brown lines for skin, dark blue for hair) can make the illustration feel softer and more integrated than stark black lines.
Storytelling Through Detail: The Final Polish
The small touches can elevate an illustration from good to captivating.
- Expression Consistency: Ensure your character's facial expression, body language, and the overall scene's mood are consistent.
- Environmental Cues: Are there falling cherry blossoms for a spring scene? Raindrops for a melancholic one? These add narrative depth.
- Texture: Suggest textures through subtle lines or shading – the softness of wool, the sheen of silk, the roughness of wood.
- Visual Interest: Add small details that reward closer inspection, like a pattern on clothing, a unique sticker on a laptop, or a small animal companion.
Common Pitfalls to Avoid When Drawing Moe Characters
Even experienced artists can fall into these traps. Being aware helps you steer clear.
- Stiff Poses: Relying too heavily on reference photos without understanding underlying anatomy or the "line of action" can lead to unnatural, static characters. Always start with a dynamic gesture.
- Same Face Syndrome: Drawing every character with identical facial features and expressions makes them indistinguishable. Experiment with eye shapes, eyebrow placements, and mouth curves.
- Unbalanced Proportions: While Moe is stylized, drastic inconsistencies (e.g., one arm much longer than the other, or a head that's too small for the body) will look jarring. Double-check your initial sketches.
- Messy Line Art: Clean, confident lines are crucial in anime and manga art. Practice drawing smooth, consistent lines.
- Over-detailing: Especially in the beginning, resist the urge to draw every strand of hair or every fold in clothing. Focus on the major shapes and forms first, then add selective details.
- Forgetting Context: An isolated character might look great, but if they're part of a scene, ensure their pose, expression, and clothing make sense within that environment and narrative.
- Ignoring Light Source: Placing shadows arbitrarily or inconsistently makes a drawing look flat and unrealistic. Always define your light source.
Your Next Steps on the Moe Journey
Mastering Drawing Moe Characters Tutorials is a continuous journey of learning and practice. You've now gained a comprehensive understanding of the core elements: from the expressive power of the face to the dynamic potential of the body, and the creative process of designing and illustrating your own original characters.
Here's how to keep progressing:
- Practice Consistently: Dedicate regular time to drawing. Even 15-30 minutes a day is more effective than one long session once a week.
- Use References Wisely: Don't just copy. Analyze how professional artists draw features, poses, and clothing. Understand why they make certain choices, then apply those principles to your own style.
- Draw from Life: Observe real people, animals, and objects. Understanding real-world forms and light helps you stylize more convincingly in an anime style.
- Experiment with Styles: While this guide focuses on a general Moe style, don't be afraid to try different approaches. Some artists prefer rounder features, others more angular. Find what resonates with you.
- Seek Feedback: Share your work with trusted friends or online communities. Constructive criticism is invaluable for identifying areas for improvement.
- Tell Stories: Use your drawings to convey narratives, emotions, and ideas. The more you put of yourself into your art, the more compelling it becomes.
The world of Moe art is rich with possibilities. With these tools and a commitment to practice, you're well on your way to creating characters that truly capture hearts and minds. Happy drawing!